About 5 years ago, my husband and I decided to create a small koi pond in our backyard. We had big dreams of a beautifully landscaped pond with beautiful flowering plants and a waterfall. Well with a lot of hard work, we were able to achieve this. This is definitely a project that any DIYer can tackle. The hardest part about this project was moving the rocks that we used to create a wall for our raised bed pond and the moving all the dirt and gravel into our backyard. This is certainly a labor of love. If you are going to skip having a raised bed then this could easily be done in a weekend. For us it took about 3 weekends and lots of help from friends and my dad.
I thought I would write a post about this with the hopes of inspiring some weekend warriors to take on this project. We have truly enjoyed our pond and it was certainly worth the effort. So let’s get started. There are two main things you need to keep in mind when picking the location for your pond. The first is sunlight. It is important for your pond to get some sunlight, but not full sun. If the pond if small (less than say 1000 gallons) the water will get really warm if it gets too much sun leading to frequent algae blooms and problems with your fish. Our pond gets about 4-6 hours of sun a day in the summer and that seems to work well. The second thing to remember is that you will need electricity at your pond to run the filter and uv sterilizer. Without this the pond will just become a breeding ground for mosquitoes. We were lucky enough to have my handy Dad help us on this one and run the new electrical box for us. If you are going to need to run electric to the location and hire an electrician, it will certainly save you money to have the pond near your house.
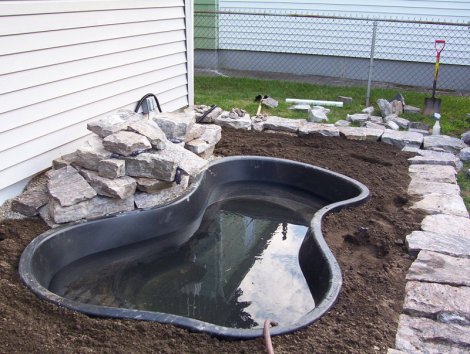
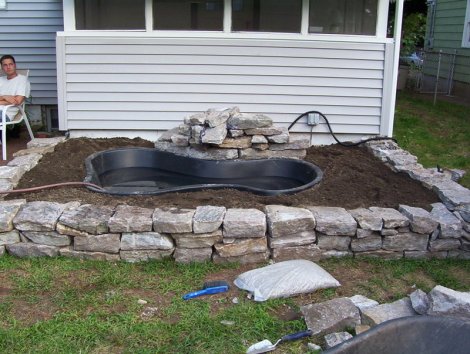
After we chose the location of the pond, we created an 15 inch high wall around the perimeter of the water garden area. We chose to use a beautiful granite that we got a good deal on from someone on craigslist, but really any sort of rocks would work. It takes quite a bit of patience to create a wall around the garden to get the rocks to fit well together. I think we moved each stone about 10 times before it made it to its final resting place. Again, this is truly a labor of love but the result is beautiful and totally worth it. Next we outlined the shape of the pond. We used a preformed pond liner which made this easy. The next step is to completely fill the inside of the rock wall with pea pebbles to help with drainage and so that all of the dirt around the pond does not just wash away when it rains. This took a huge amount of gravel, but 5 years later it is still holding up well so it was worth the effort and investment. Once the gravel is in place, dig out the area inside the outline of the pond and level it out. This is very important if you want your pond to be level when it is filled. We used sand under the pond to make sure to was completely level before putting the pond in. We dug out about half the depth of the pond so that the top of the pond would be level with the top of the wall. Once you have done this, you are ready to place the pond on the level sand foundation you have created and fill around the pond with dirt. Here is what it will look like.
One part of this project that was tricky was building the waterfall. I can not take credit for this part though as this was my Dad’s work and he did a great job. We did use and adhesive foam in a couple of place to keep the stones in exactly the right place. The foam is initally black (yuck, an eye sore if you ask me) but within a couple weeks the sun bleaches it and it become the color of the stones. You can hardly even notice it now. One of the things that takes a lot of trial and error is picking a stone for the water to run down to create a water fall and then creating the correct placement for it. There is no right way to do this. It is really just trial and error until you get it right. Then once you have it right you run the hose from your pond pump through the back of the waterfall and presto…you now have a water feature. One tip, don’t use the foam until you get the stones in place because it makes them permanent and it is horrible to remove.
One of the things that you will notice is that we had to put a stone under the waterfall. This is because when we turned on the waterfall the splash from the water was splashing out of the pond. This was a simple way to fix this.
I hope seeing the pond that we created in our backyard will inspire all you weekend warriors to take on this project. Like I said before, this projet does not take a lot of skill, just hard work and patience. Our pond does have a filter and uv sterilizer which I will discuss more in another post. I will also discuss pond fish and their care in a future post. If you have questions about this process please feel free to email me. Good luck and happy water gardening!


