Posts tagged DIY

Growing Fruits and Veggies in Part Shade

This year is not my typical gardening year.  In fact, it is totally different.  For starters, we moved to a new house so the garden that I have worked so hard to create over the last five years is gone.  I was thrilled to see that the new house has three raised beds already there, yippeeee! Due to moving and all the “fun” involved in that process, I have completely missed planting an early spring garden.  The three raised beds were completely over run with weeds and looked like no one had taken care of them in years.

Another big change in my garden this year is that the garden only gets part sun.  Many varieties of veggies and fruits require full sun so I knew from the beginning that I was going to have to make some changes.  There is one part of the garden that gets almost full sun so that area is being reserved for tomatoes and strawberries because they are sun lovers.  My garden this year will be considered “experimental” as many of the things I will be growing are new to me.  I have been trying to educate myself about shade gardens and I have learned a lot already.


gardening pic

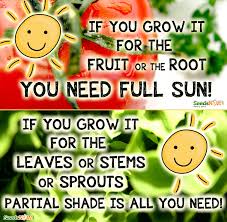
These are truly words to live by when creating a garden and trying to figure out what can go where.  In the next post I am going to go over my garden layout and what I am planting where but first I wanted to add some more information about having a part shade garden.  I am going to save discussing a full shade garden for another day because that can be pretty tricky with fruits and veggies.

What kind of shade does your garden get?

This is very important to consider because all shade is not created equal.  Shade that results from trees hanging overhead is referred to as “dappled shade” vs. shade that results from a building or structure creating the shade. The significance of this is that shade that is created from trees often still lets through some light and may leave a garden looking shaded, but still be pretty bright.  True partial shade gardening is certainly tougher than dealing with dappled shade. With that being said though, many wonderful gardens can be grown in part shade.  If you are interested in creating more light in your garden you could certainly consider using reflective mulch or other reflective surfaces.   At least for this year, I am just going to stick with more traditional gardening.

One of the things that is easy to overlook at you design your garden layout is that the amount of sun and shade that each part of your garden gets is going to change over the course of the season (depending on what type of shade you get).  Make sure to take this into account as you plan your garden so that you are not disappointed with the results.  This will be very important for me this year because I am planting a few things that actually prefer shade.  Many leafy greens prefer cool spring time planting over summer planting because they can not tolerate the heat of the summer.  These same greens can however be grown in the summer if they only receive a little bit of sun.  If I plant these in an area that will eventually get more sun, then it is very unlikely that I will not get a good yield.  I know it is boring and for me hard to remember to do, but spend a week or so tracking the amount of sun your garden gets. Write it down and then use this info to design the layout for your fruits and veggies. This little bit of work will help ensure that your garden has great yields.

If you are interested in more information about shade gardening, please follow my blog and receive updates and articles all season long about gardening in sun and shade.

Next Post:  Laying out a part shade garden


Comments (1) »

Make Your Own Sweet Pea Trellis

In a previous post, I mentioned making your own trellis for your peas to grow up.  Now, there are tons of different ways you can do this and all of them will probably work great.  After all, peas do not care what their trellis looks like, only that it is suitable for them to grab onto and grow up.  Last year, my daughter and I made a trellis out of posts and rope and it worked great.  It was not the most beautiful thing, but we had so much fun making it that I thought we would do the same again. The best part is that there was no out-of-pocket expense because I had everything I needed in my garden shed.

The process of creating the trellis is so simple. In fact, my almost 4 year old did it with very little help from me and she had so much fun. Here is what you do. Take two wooden stakes (about 5+ feet tall and drive them into the ground far enough apart that you can plant all your peas in between them.  Then take a piece of thin rope and tie it around one post.  Next wrap the rope around the other post being sure to pull it pretty tight so it stays in place.  Then weave the rope back and forth between the two posts making sure to wrap it around a different part of the post each time.  You will create a spider web like trellis for your peas to grow up.  Once you have finished weaving the rope back and forth, tie it off and get ready to plant you peas.

I started my peas in the green house a few weeks ago because my soil was not ready.  After my daughter made the trellis, we planted our pea plants in between the two post.  Place the peas directly under the first row of rope.  Remember that you may need to train your peas to climb up the trellis, but that should be easy if you planted them right under the first row of rope.  Happy Gardening!

Making the trellis all by herself!

Our little seedlings!

What kind of trellis do you use for you peas?  Did you make it yourself?  

Leave a comment »

DIY Water Garden and Koi Pond

About 5 years ago, my husband and I decided to create a small koi pond in our backyard. We had big dreams of a beautifully landscaped pond with beautiful flowering plants and a waterfall. Well with a lot of hard work, we were able to achieve this.  This is definitely a project that any DIYer can tackle.  The hardest part about this project was moving the rocks that we used to create a wall for our raised bed pond and the moving all the dirt and gravel into our backyard.  This is certainly a labor of love.   If you are going to skip having a raised bed  then this could easily be done in a weekend. For us it took about 3 weekends and lots of help from friends and my dad.

I thought I would write a post about this with the hopes of inspiring some weekend warriors to take on this project. We have truly enjoyed our pond and it was certainly worth the effort.  So let’s get started.  There are two main things you need to keep in mind when picking the location for your pond.  The first is sunlight. It is important for your pond to get some sunlight, but not full sun. If the pond if small (less than say 1000 gallons) the water will get really warm if it gets too much sun leading to frequent algae blooms and problems with your fish.  Our pond gets about 4-6 hours of sun a day in the summer and that seems to work well.  The second thing to remember is that you will need electricity at your pond to run the filter and uv sterilizer. Without this the pond will just become a breeding ground for mosquitoes.  We were lucky enough to have my handy Dad help us on this one and run the new electrical box for us.  If you are going to need to run electric to the location and hire an electrician, it will certainly save you money to have the pond near your house.

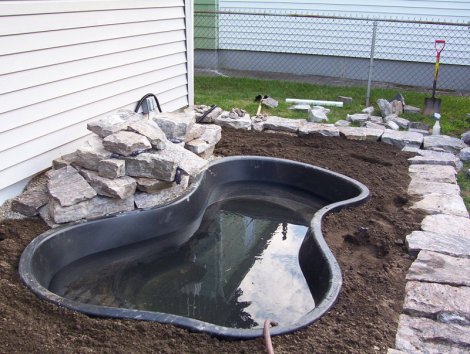
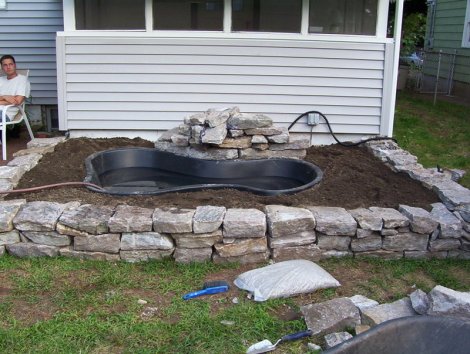
After we chose the location of the pond, we created an 15 inch high wall around the perimeter of the water garden area. We chose to use a beautiful granite that we got a good deal on from someone on craigslist, but really any sort of rocks would work.  It takes quite a bit of patience to create a wall around the garden to get  the rocks to fit well together. I think we moved each stone about 10 times before it made it to its final resting place.  Again, this is truly a labor of love but the result is beautiful and totally worth it.  Next we outlined the shape of the pond. We used a preformed pond liner which made this easy.  The next step is to completely fill the inside of the rock wall with pea pebbles to help with drainage and so that all of the dirt around the pond does not just wash away when it rains. This took a huge amount of gravel, but 5 years later it is still holding up well so it was worth the effort and investment.  Once the gravel is in place, dig out the area inside the outline of the pond and level it out. This is very important if you want your pond to be level when it is filled.  We used sand under the pond to make sure to was completely level before putting the pond in.  We dug out about half the depth of the pond so that the top of the pond would be level with the top of the wall.  Once you have done this, you are ready to place the pond on the level sand foundation you have created and fill around the pond with dirt.  Here is what it will look like.

Our pond filling for the first time!

One part of this project that was tricky was building the waterfall.  I can not take credit for this part though as this was my Dad’s work and he did a great job.  We did use and adhesive foam in a couple of place to keep the stones in exactly the right place.  The foam is initally black (yuck, an eye sore if you ask me) but within a couple weeks the sun bleaches it and it become the color of the stones.  You can hardly even notice it now.  One of the things that takes a lot of trial and error is picking a stone for the water to run down to create a water fall and then creating the correct placement for it. There is no right way to do this. It is really just trial and error until you get it right. Then once you have it right you run the hose from your pond pump through the back of the waterfall and presto…you now have a water feature.    One tip, don’t use the foam until you get the stones in place because it makes them permanent and it is horrible to remove.

Almost ready to plant flowers

Water running, a few flowers planted and mulched. Time to relax!

One of the things that you will notice is that we had to put a stone under the waterfall. This is because when we turned on the waterfall the splash from the water was splashing out of the pond. This was a simple way to fix this.

I hope seeing the pond that we created in our backyard will inspire all you weekend warriors to take on this project.  Like I said before, this projet does not take a lot of skill, just hard work and patience.  Our pond does have a filter and uv sterilizer which I will discuss more in another post.  I will also discuss pond fish and their care in a future post.  If you have questions about this process please feel free to email me.  Good luck and happy water gardening!

Comments (59) »

Compost: Because a Rind is a Terrible Thing to Waste

I have decided that this is going to be the year that I take our family garden to the next level.  Last year, we had a wonderful garden and have decided to double its size this year because we all enjoyed it so much.  One of the things that I have been learning about is composting. Now let me start by saying that this is something that I have never attempted at all. To be honest, I have always had this vision of my compost pile being a big stinky heap of trash in my backyard.  I also have a pretty small yard, so I don’t have a far away place to stash this bin if it becomes stinky.  I have decided to put my worries aside and take on this task once and for all.  I have had many gardeners tell me that what sets a spectacular garden apart from a regular garden is good compost.

I have been doing my research and it seems that I can compost on a rather small scale.  This has been one of my other main deterrents before now. I had always heard that the bigger the compost bin the better the compost.  After hours of reading internet articles about this, it seems as if that is not true.  I recently read an article about people who compost in small trashcans on the rooftops of city apartments.  If they can do it then so can I…right? My goal for this weekend is to make a small compost bin.  Here is a link for how to make your own compost bin out of a plastic container.  I have to admit I have not been this excited about one of my project in a while.  The article I linked makes it sound like this is going to be a pretty easy process.

One of the reason that I decided to post this before I have even created the bin is I am hoping to get some advice from all my fellow gardeners.  I did read a bit about how to keep the bin from getting stinky by not letting it get too wet, but I am still concerned about bugs and rodents taking over the bin. I mean, it seems only natural that these things would want to take over my bin.  I would love a couple of guest posts from all of you out there that have created compost bins, so that I can hopefully let go of my concern of being the “lady with the stinky, rodent and insect infested garbage pile in her yard”.  I guess even if I never get good compost, I will surely get a laugh from this one.  Ok so here is the plan. I am going to wake up tomorrow (bright and early because my girls get up with the birds) and make my very first compost bin.  So please, help a mommy out and send me some advice and tips so that I will have the best garden on the block.  I will continue to post as I get this up and running and will add all the things I am learning as I go along through this project.

I am going to add a few links here to catch people up on what I have been reading in case anyone wants to jump in on the fun and learn how to compost along with me. Come on and give it a try…you know you want to!

Composting 101 

small scale composting -this one is a little larger scale than I had in mind but had some good tips

The scientific explanation of composting 

163 things you can compost– this is awesome! Thanks Heather for adding it.

Composting in the city, with little money

Comments (6) »

Set Your Sights on These Sites

One of the reasons that I wanted to create this blog is to give DIYers a place to go to find information more quickly than it can be found by searching the internet.  Before I do a project, I often spend many hours scouring the internet and my collection of books for advice on how to do things or better ways to do things I already know how to do.  The internet is the most amazing tool as you truly can find anything you are looking for.  I am going to tell you about a few of my favorite sites for Do-it-yourself projects.

1. Youtube.com

Ok so I know what you are thinking.  Duh Kelly, everyone knows that. The reason that I put is as my number one site is because you really can find just about any how to video and sometimes you even get written instructions along with it. For example, last year I learned how to crochet kids hats on youtube.   I have learned how to strip paint, hang a door, install carpet, stop my stairs from squeaking and a million more things.  So next time you are stuck, check Youtube. The answer is surely there.

Here is the link to make your own baby hat.  You will need to know how to crochet and then the video will show you the rest.  If you do not know how to crochet there is a beginning video for that too.

Crochet Baby Hat

2. Allrecipes.com

I use this website daily for things like looking up a bread recipe to finding a recipe that uses the food in my fridge. It has a very simple to use recipe box feature that makes it easy to save recipes that you like.  One of the things that makes this site better than others, in my opinion, is that it allows you save notes about a recipe after you have made it.  This is so handy when you make changes to a recipe.  This is a unique feature for an unpaid user.  Most sites make you pay a fee to be able to do this.

3. Mamacheaps.com

So if you don’t know about this one hold on to your pants. Ok, but seriously this is one of my favorite blogs.  The woman that writes this blog is constantly adding new coupons and discounts that she has found.  Some days there are 50+ things added.  This is a great resource for someone that wants to learn more about using coupons and saving money.  She also posts all kind of great deals from all over the web.  This is really one to check out.

So there you have it…my top three!  I must say that I have also heard AMAZING things about pinterest.com but have not yet had the chance to truly explore the site so I am not ready to add it to my top sites list.

When I created this blog my vision was to create a blog where I could put some of my own tips but also a place where other people could add their ideas, know how and inspiration.  I would love to hear what your favorite sites are. Send them to me and I will add them to the list.  I can’t wait to see what sites other people love.  If you would like to tell me about a couple of the sites you like and do a guest post please let me know and I will tell you what you need to do. Thanks again!

Comments (5) »