Salted Caramel and Chocolate Cookie Bars

Caramelitas232

Last night as I was getting ready for bed, I heard the sound of a snow shovel banging the pavement outside my house.  My first thought was, “I hate winter! Please spring hurry up”! In my neighborhood, people are really go getters when it comes to shoveling.  The last snow flake has barely fallen before people are out there clearing the walks and driveways.  On this particular day, it had only snowed a few inches so I knew that it would not be enough to warrant my neighbor getting out his snow blower and so kindly doing his walk and mine, but that it was too much to ignore, so I would have to shovel.  I can’t really complain too much though as like I said, we have the world’s best neighbors who have been so kind as to use their snow blower to clear our sidewalk and driveway all winter long.  I could never thank them enough, so I always bake them something special just to say thank you.

Just before I got into bed I decided to peek out my window and see which of my neighbors was so motivated that they were shoveling their walk at 10:00 at night.  As I looked out the window, I was shocked (and thrilled) to see that the teenage boy who lives next to me was actually out there shoveling MY driveways. OMG what a fantastic surprise.  I quickly put on my slippers and popped out the doors to say thank you, thank you, thank you to this sweet young man.  He just smiled and said “sure no problem” as if this is something all people do.  As I laid in bed thinking about that kind kid, I knew I had to bake him something really really delicious.  Salted Caramel and Chocolate bars were the perfect thing!

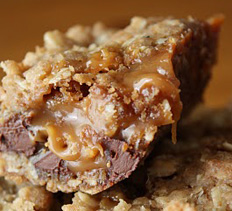
Let me start by saying that I think this may be one of the most delicious and most addictive things I have ever baked.  The best part is that it is actually a really simple recipe too.  People will love you for these and think that they were much harder to make then they actually were.

Here is what you need:

1 c. flour

1.5 c. oats (old-fashioned or quick oats)

1 tsp. baking soda

1/2 tsp salt

3/4 c. (1 and a 1/2 sticks) melted butter

3/4 c. packed brown sugar

3/4 c. chocolate chips

The caramel decision:

Next you will have a decision to make.  For the caramel sauce, you could easily melt about 30-40 caramel squares in a pan with about 1/2 c. of heavy cream. Then add about 1/2 teaspoon good sea salt once the caramel is melted and smooth.  If you are feeling a bit more adventurous you could make a salted caramel sauce. I had made this a few days ago for another recipe so I had some in my fridge already.  I think for many people making caramel might sound a bit intimidating.  Well let me tell you, if I can do it, you can do it.  The only hard part was not getting distracted and walking away.  You just need to stay with it for the entire 5 minutes or so in order to keep it from burning.  This is such a delicious sauce that I really recommend that you make it.  If you follow the recipe here for salted caramel sauce it will make some extra. You will need about half for this recipe. Put the other half in the fridge in a jar and enjoy on everything (or just by the spoonful as I do).

For the caramel sauce you will need either:

30-40 caramel squares

1/2 c. heavy cream

1/2 tsp. sea salt

OR

1 recipe for Salted Caramel Sauce ( you will only need about half for this recipe)

Here is what you do:

Preheat the oven to 350 degrees. Combine the flour, oats, baking soda, salt and melted butter.  Spread half of the mixture on the bottom of and 8×8 baking dish and bake for 10 minutes.  After 10 minutes, remove from oven and evenly pour chocolate chips and caramel sauce over the crust.  Then spread the remaining dough mixture on top.  Then return to the oven and bake for about 15-20 more minutes or until he edges are bubbly and golden brown.  Remove from the oven and allow to cool before cutting and removing from the pan.

You may be thinking that this makes a pretty small batch as it is baked in an 8 x 8 pan. Well it does and at first I was tempted to double the recipe.  These are so delicious and irresistible that I was glad I did not double it.  We gave about half to the neighbor kid and then ate the rest at home. I literally could not control myself around these.  Every time I walked into the kitchen, I had just a little piece.  That little piece became half the recipe in no time.  I was glad when they were gone so I could go back to life and stop obsessing over these.  Hope you enjoy them as much as I did!
Comments (1) »

Decadent and Simple Homemade Strawberry Ice Cream

images (2)Last summer we got an ice cream maker and we perfected making frozen yogurt.  There are so many simple and delicious variations on frozen yogurt that we never got bored just making frozen yogurt.  Three of my favorites were nonfat key lime frozen yogurt, blueberry vanilla frozen yogurt and nonfat peach frozen yogurt.

This year I decided that it was time to give good old-fashioned ice cream a try.  Boy am I glad I did.  It is so simple and so delicious.  It is not exactly what I would call “healthy,” but as an occasional treat it is a wonderful indulgence.  I started with a basic recipe and then modified it a bit to make it how I wanted it. Due to the fact that it is strawberry season right now, the strawberries are amazing and brought such sweet and amazing flavor to this ice cream.   I made a double batch which should be for about 8 people, but realistically in our house it is enough for 6 people.

Here is what you need:

2.5 cups whole milk

2 cups light cream

1.5-2 cups sugar (depending on how sweet you like it)

6 tbsp. corn syrup

6 egg yolks

1 tbsp. good vanilla extract

2 quarts strawberries, pureed but leave some chunks

Here is what you do:

In a saucepan, heat the milk and the cream together leaving 1 cup of milk aside in a separate bowl.  You will temper this in later with the eggs. Heat the milk and cream until it begins to bubble around the edges.  Whisk almost constantly while it is getting to this point. DO NOT BOIL.  In a bowl, combine the 1 cup of milk, the sugar, corn syrup, egg yolks and vanilla.  Stir to combine. Once combined, slowly whisk the hot milk and cream into the bowl.  Be careful to do this slowly so do not you do not scramble the eggs.  Once all of the hot milk has been added to the bowl, return the entire mixture to the saucepan and heat until bubbles form around the edges.  Once bubbles form, heat for approximately 5 more minutes, but do not boil.  It will begin to thicken slightly.  You must stir this constantly. Once it coats the back of a spoon it is done.  Next pour the custard into a bowl and add the strawberry puree.  Stir to combine.  Cover the custard and refrigerate until thoroughly chilled.  This will take about 4 hours.  The custard must be thoroughly chilled or it will not set up in the ice cream maker.  Once chilled, add to ice cream maker according to the manufacturers instructions.

This experience showed me that making delicious old fashioned ice cream is simple and only takes a little time.  My family went crazy over this ice cream. I literally found myself taking a bite out of it every time I walked into the kitchen.  This is a treat that is totally worth it.

I would love to hear about your adventures in making homemade ice cream.  What is your favorite flavor to make?

Comments (3) »

Tips and Tricks for Growing Perfect Sweet Potatoes

sweet potatoesIf you have perused through my blog then you know that I love gardening.  One of the things that gets me really excited each season is trying to grow something new in my garden.  Any of you that have a garden know that it is often not as simple as just planting what you like and then watering it. Many fruits and vegetables can be quite picky about the soil ph, the amount of sun they get and even the amount of water.

This year I have taken on a new endever and I trying to grow one of my favorite veggies. SWEET POTATOES!!!  I have been nervous about growing them in the past as things that grow underground seem really tricky to me so I just avoid them.  I mean how do you know how they are doing if you can’t see them?  This year I have tossed that concern aside and have planted 9 sweet potato plants in one of my raised beds. I have been doing lots of research on growing sweet potatoes so I thought I would share all that I have learned.  From my research, it seems like sweet potatoes are actually going to be pretty easy to grow.  This year I planted a variety of sweet potatoes called Beauregard Sweet Potatoes.  It is favored for high yields of uniform, reddish-purple potatoes with tasty, deep-orange flesh that keeps well in storage. They are also disease resistant and resist cracking.

Here are some tips and tricks for successful sweet potato gardening:

1. Till the soil to depths of about 10-12 inches

Sweet potatoes like rather sandy soil that is loose and well tilled. Soil that is packed tight will not allow enough space for the tubers to easily grow.

2. Water deeply about once a week

Sweet potatoes need moist well draining soil.  It is necessary to water them really deeply about one a week.   This would be a good time to use the sprinkler as it may be pretty time consuming (not to mention boring) to give them enough water. It seems about 1 inch of water a week is necessary. On a side note, I did read that you should not water your sweets in the last 3-4 weeks before harvest as this will keep your mature tubers from splitting. Not sure if this is true, but thought it would be worth sharing.

3. Keep them warm

Sweet potatoes like warm soil and sunlight. If you are in the south then the warmth should not be a problem.  My sweets are going to get about 6 hours of sun a day. I am not fully convinced that this is enough, but it is the sunniest place I have to plant them.  Due to the low sun, I am going to apply extra mulch or maybe even black plastic mulch to help keep the ground warm.

4. Side dress with compost

It sounds silly right?  What this means is that about a month after planting, it is a good idea to put a good amount (about a spade full) of compost on each side of the plant.  Then your plant is dressed.  🙂

5. Harvesting

This is the really scary part for me.  I mean what if I dig them up too early and they are too small or too late and they are all rotted.  Yikes!  It seems like the best thing to do is to follow the guidelines for the variety of sweet potato that you planted. Most will be ready for harvest somewhere between 90-120 days.  Make sure you make a note of when you planted them.  I also read that the leaves will begin to turn yellow when the potatoes are ready for harvest.

If this all sounds pretty simple, it is because I “think” it is.  This is truly a learning as I go experiment for me this year.  Want to learn more about sweet potatoes?  I am going to post a few links that the bottom that I enjoyed.  Do you know the difference between a sweet potato and a yam?  I thought I did, but it turns out I was wrong.

I am going to post pics and updates on my sweets as the season progresses. I would love to hear about your success/struggles growing sweets. Happy Gardening!

Sweet Potatoes are a superfood

10 ways to cook a sweet potato

Fun facts about sweet potatoes (who knew they are the official vegetable of North Carolina)

Comments (4) »

Using Old Coffee Grounds in the Garden

coffee

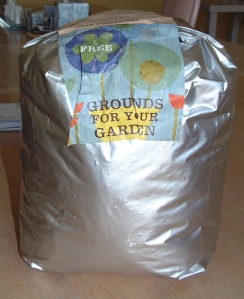
If you come to my house, one of the things you will always find is coffee in my coffee pot.  I am truly a coffee addict. I drink it all day long and never start a day without it.  My love of coffee has however left me with a surplus of leftover coffee grounds.  As I was dumping yesterday’s coffee grounds into the compost bin last night, it occurred to me that maybe it was time for a post on all the awesome ways to use your coffee grounds in the garden.   Without further adieu…

1. Put coffee grounds in your compost bin:

Coffee grounds are a wonderful thing to add to your compost as they are high in nitrogen and will make great compost for nitrogen loving seedlings like tomatoes.  Coffee grounds have a ratio of 20:1 nitrogen to carbon which is great for compost.  The only thing you want to consider if you add a lot of coffee grounds to your compost is that for approximately every 11 lbs of coffee grounds you add you want to add about 2 tsp. of lime.  This will make sure that things are well balanced.  If you don’t already have a compost bin, check out how you can simply make your own compost bin from an old Rubbermaid container.

2. Spread coffee grounds around plants:

Some plants will love it if you spread the coffee grounds on the ground around the plant.  Spread them approximately as far out as the branches reach.  Plants like hydrangea, tomatoes, blueberries, cranberries, citrus fruit, camellias, gardenias, rhododendrons, and vireyas all love a ph of between 3.0 and 5.0 and coffee grounds will help to achieve this.

3. Make your hydrangea blooms blue:

Did you know that you can alter the color of your hydrangea blooms by controlling the ph of the soil. Blue hydrangea can be achieved through lowering the ph of the soil. Coffee grounds are a great way to achieve this.  On the other hand, if you prefer pink hydrangea you can add lime to the soil to help encourage the blooms to be pink.  For more information about hydrangea check out think article.

4. Using coffee grounds as mulch:

If you have access to a lot of coffee grounds (like if you live next door to a coffee shop), you can use the coffee grounds as mulch for your garden. Just remember to add about 2 tsp. of lime for every 11 lbs of coffee grounds. Also, don’t spread it on too thick as it will mold if it is too thick.  No more than 1/2″ is perfect.  On a side note, I have heard a rumor that Starbucks gives their used coffee grounds away for free for gardeners!

5. Make a liquid garden feed:

If you would like to make a wonderful liquid feed for your garden, place left offer coffee grounds in a bucket and fill with water.  Let the bucket sit for a day or 2 until it turns a nice rich brown color.  Then use the liquid to feed your garden.  My tomatoes go wild when I do this. They LOVE it.

6. Coffee grounds will deter some garden pests:

Did you know that garden slugs hate coffee. Maybe that’s why they move so slow LOL.  Anyways, if you sprinkle coffee grounds around your garden it will help deter slugs and snails from inhabiting your garden.  You can even use the grounds to make a sort of barrier around the garden.

7. Worms love coffee grounds:

If you are luck enough to have a worm bin :0 then you can add some coffee grounds to your worm bin.  About a cup a week is good for most small worm bins.  Maybe this is why I have so many earthworms in my garden.

8. Coffee grounds may fight some garden mold and fungus:

Some research suggests that coffee grounds might help fight off some  common garden fungus and mold such as Fusarium, Pythium, and Sclerotinia species.  This may be a great organic way to keep common garden mold and fungus in check.

I am hoping this article inspires at least one person to save their coffee grounds and reuse them in the garden.  I am sure there are many other uses for coffee grounds both in the garden and around the house.  Do you know one that I have not listed?  I would love to hear from you.  I hope this article was helpful. Happy gardening!

Comments (5) »

Growing Fruits and Veggies in Part Shade

This year is not my typical gardening year.  In fact, it is totally different.  For starters, we moved to a new house so the garden that I have worked so hard to create over the last five years is gone.  I was thrilled to see that the new house has three raised beds already there, yippeeee! Due to moving and all the “fun” involved in that process, I have completely missed planting an early spring garden.  The three raised beds were completely over run with weeds and looked like no one had taken care of them in years.

Another big change in my garden this year is that the garden only gets part sun.  Many varieties of veggies and fruits require full sun so I knew from the beginning that I was going to have to make some changes.  There is one part of the garden that gets almost full sun so that area is being reserved for tomatoes and strawberries because they are sun lovers.  My garden this year will be considered “experimental” as many of the things I will be growing are new to me.  I have been trying to educate myself about shade gardens and I have learned a lot already.


gardening pic

These are truly words to live by when creating a garden and trying to figure out what can go where.  In the next post I am going to go over my garden layout and what I am planting where but first I wanted to add some more information about having a part shade garden.  I am going to save discussing a full shade garden for another day because that can be pretty tricky with fruits and veggies.

What kind of shade does your garden get?

This is very important to consider because all shade is not created equal.  Shade that results from trees hanging overhead is referred to as “dappled shade” vs. shade that results from a building or structure creating the shade. The significance of this is that shade that is created from trees often still lets through some light and may leave a garden looking shaded, but still be pretty bright.  True partial shade gardening is certainly tougher than dealing with dappled shade. With that being said though, many wonderful gardens can be grown in part shade.  If you are interested in creating more light in your garden you could certainly consider using reflective mulch or other reflective surfaces.   At least for this year, I am just going to stick with more traditional gardening.

One of the things that is easy to overlook at you design your garden layout is that the amount of sun and shade that each part of your garden gets is going to change over the course of the season (depending on what type of shade you get).  Make sure to take this into account as you plan your garden so that you are not disappointed with the results.  This will be very important for me this year because I am planting a few things that actually prefer shade.  Many leafy greens prefer cool spring time planting over summer planting because they can not tolerate the heat of the summer.  These same greens can however be grown in the summer if they only receive a little bit of sun.  If I plant these in an area that will eventually get more sun, then it is very unlikely that I will not get a good yield.  I know it is boring and for me hard to remember to do, but spend a week or so tracking the amount of sun your garden gets. Write it down and then use this info to design the layout for your fruits and veggies. This little bit of work will help ensure that your garden has great yields.

If you are interested in more information about shade gardening, please follow my blog and receive updates and articles all season long about gardening in sun and shade.

Next Post:  Laying out a part shade garden


Comments (1) »

Sanitize Your Toothbrush for Pennies

tooth

Just the other day some of my mommy friend’s and I were talking about how disgusting toothbrushes can get.  That inspired me to do a little research and here is what I came up with.  A great way to sanitize your toothbrush for pennies. This is for you Mandy.

Here is all you need to do. Once per week, soak your toothbrush in a cup of hydrogen peroxide for about 5 minutes.  When you are done, simply rinse and let dry. It is also best to always store your toothbrush upright so that it can dry thoroughly between uses. If you prefer, you could soak your toothbrush in white vinegar as that would have the similar sanitizing effects.  Who knew keeping your toothbrush clean could be so easy and cheap.  Guess I won’t need to buy that $50 toothbrush sanitizer anymore.  Always remember, a penny saved is a penny earned!

Leave a comment »

Pumpkin Granola Muffins

Due to the fact that we are currently home bound due to getting 40″ of snow in 24 hours two days ago, we have been doing lots of baking.  We just made these for the first time today and boy are they yummy. We LOVE anything pumpkin in our house, so we are always looking for a new recipe that includes vitamin packed pumpkin.  This recipe was adapted from one I saw from Libby’s Pumpkin website.

Here is what you need:

1 c. whole wheat flour 143809lrg

1 tsp. cinnamon

1/8 tsp. allspice

1/4 tsp. nutmeg

3/4 tsp. baking powder

3/4 tsp. baking soda

1/2 tsp. salt

1 c. packed brown sugar

1/4 c. canola oil

1 can pumpkin

2 eggs

1/2 c. mini chocolate chips

1/ 2 – 1 c. low-fat granola

Here is what you do:  

Preheat the oven to 350. Then beat together the sugar and the oil until well combined.  Next add the pumpkin and the two eggs to the brown sugar and oil. Beat this until very well combined. In a separate bowl, combine the flour, cinnamon, allspice, nutmeg, baking powder and baking soda.  If you have it on hand, you could use pumpkin pie spice in place of the nutmeg, cinnamon and allspice.  Add the dry mixture slowly to the wet ingredients and beat slowly to combine.  Finally stir in the chocolate chips.

Once combined, spoon batter into lightly greased mini muffin tins. Fill almost completely. Then top each muffin with about a 1/2 tsp of granola. Press the granola into the batter slightly.  Bake for about 18-20 minutes or until golden brown and a toothpick inserted in the middle comes out clean.

These muffins are a wonderful snack for both kids and adults.  They are healthy and not overly sweet, but the mini chocolate chips made my kids think they were having a dessert.  My kids loved them and begged for another one.  These types of muffins freeze really well too so they are a great snack to pack into the freezer and then throw them in a lunch box for a tasty lunchtime treat.  Hope you enjoy and happy baking!

Leave a comment »

The Avocado Smoothie Your Kids Will Love

Avocado Smoothie

Last year, juicing was all the rage in my house. This year, we have moved in a similar but slightly different direction…smoothies!  Thanks to my friend Jen and her facebook posts about the delicious smoothies that she made with her family, we have started to make smoothies too.  Now don’t get me wrong, I still love juicing but making smoothies requires less cleaning in the end. The one thing about juicing that I hate is having to take apart and clean the juicer when we are done.

Making smoothies allows us to use most of the same ingredients, but creates a frozen concoction that my kids can’t resist.  We initially started with your typical type of smoothies. You know, bananas, yogurt, ice and orange juice.  This is delicious but not quite healthy enough if you ask me.  The cool thing about smoothies is that some frozen fruit can really hide the taste of all the healthy stuff.

There are 2 things that I always put into each smoothie.  These are wheat germ and flaxseed meal.  If you are not familiar with these two things I highly recommend that you check out these links and learn about all the awesome health benefits of wheat germ and flaxseed.   Just a word of warning though with regards to flaxseed.  It can have a mild laxative effect so you may not want to add too much at once. We add about a 1/4 of wheat germ and 2 tbsp. of flaxseed to each blender full of smoothies.

Health benefits of wheat germ

Health benefits of flaxseed meal

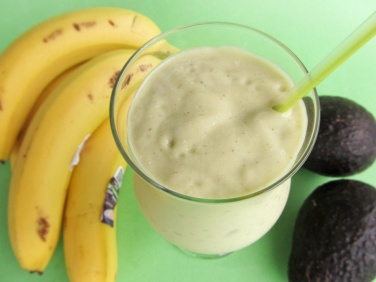
Now let’s move on to the recipe for what I have to call the tastiest avocado smoothie ever.  I love avocados and both of my kids did when they were toddlers, but now as preschoolers they have become much pickier eaters.  This is where the whole smoothie thing comes in.  This is a great way to sneak in the healthy stuff without getting any complaints or whining from the kids.

The ingredients are: (makes 4 smoothies)

2 bananas

1/2 ripe avocado

 6 oz. container greek yogurt (any fruit flavor you like)

1/4 c. wheat germ

2 tbsp. flaxseed meal

1.5 cups frozen mango

5-10 ice cubes depending on how thick you like it

1.5-2 c. orange juice

Blend all of these together until rich and creamy.  We swap out the type of fruit daily depending on what we have on hand.  I buy my frozen fruit at Trader Joe’s.  I think they have the best selection and the prices on frozen fruit can not be beat.

Once you try this you will be hooked and proud to give yourself and your family such a delicious snack. We make these smoothies almost everyday after school and I feel good knowing that they are getting lots of vitamins, protein from the greek yogurt, omega 3’s from the avocado and much more. Please let me know how it turns out if you try it.  Happy blending!

What’s your favorite ingredient to add to smoothies?  I would love to hear from you!

If you love avocados as much as I do, check out this recipe for Avocado Egg Salad!  This recipe was create by an awesome blogger who focuses on nutrition and fitness.  I can’t wait to try this!

Comments (3) »

Mommy’s Time Out!

Wow, I can’t believe how long it has been since I posted something on my blog. The truth is that the last couple of months have just been insane in my house.  I feel like I am never getting anything accomplished.  The worst part about this is that when life gets like this the last thing any of us have time for is a little mommy time, but missing out on that little bit of me time sucks!

In the interest of  getting back some mommy time, I decided a couple of months ago that I would give running a try.  Yes, running!  Any of you that know me know that I hate to run. I have often said that I only run when someone is chasing me.  Well things have changed a bit (or a lot).

About 2 months ago, while at the gym just cruising along on the elliptical machine, I had the idea that I should try to run…just a little.  Well, just a little has turned into quite a bit.  I started out with the goal of running one mile.  Once I ran 1 mile, I felt so proud of myself that I wanted to run 1.5 miles.  Now this had turned into a competition with myself always trying to run just a little bit longer or faster.

I have found that running is actually pretty amazing for me both mentally and physically.  My body feels great after a run and my mind feels great after having 45-60 minutes of mommy time.  Time where no one talks to me, needs a snack, wets their pants or cries. We recently joined the YMCA and wow there is nothing like free babysitting to motivate you to exercise. I find that in those crazy days when I am at my limit, the idea of being able to get a little down time from 2 small children is enough to get my ass on the treadmill.

I have convinced a friend (thanks, Jen) to run with me and that certainly makes it fun too.  One of the things people have asked me is  “how long will this last”?  Truthfully, I am not sure.  I do have a tendency to go full steam head with things and then get bored and stop, never to do it again.   The thing that has been keeping me going is that I keep setting a new goal. These little goals are keeping me motivated right now.

This coming Sunday I am going to be running in my first race ever!  The best part is that three of my best friends will be running right along with me.  Right now I feel like even if I never run again I have already completed a huge achievement considering that just a few months ago I could have barely run to the end of my street.

You may be wondering why I am sharing all this.  Truth is, as I was thinking about a post for my blog, I got to thinking about how it is so easy to get caught up in the hustle and bustle of life and how easy it is to cut out the things that seem unnecessary.  This leads us to feeling bored in our routines and having a short fuse (for me) with the people around us.  It is so important when we are raising our kids not to neglect ourselves and just assume that when our kids leave the nest then we will get back to taking time for ourselves.

If I have gotten even on person thinking about what they can do add something fresh into their life then the time I took writing this was worthwhile.   Set a goal for yourself now. Instead of waiting until the new year to make a resolution, make one now with the goal of keeping it up until the new year.  Reframing your goal to be something that you can accomplish in 30 days is much more motivating that one that lasts all year.

What do you do to give yourself some me time?  Do you try to make a little time for yourself each week?  I would love to hear about what you do to take care of yourself or what you plan to do!

. Imagine if it really worked this way! 🙂

If you are interested in running, here is the link to a fantastic running blog called Organic Runner Mom. I went to High school with Sandra and her blog is totally awesome and motivating!

Comments (3) »

Oatmeal Apple Craisin Muffins

Wow it has been a long time since I have posted something.  I am not entirely sure where the time has gone.  All of the sudden, the summer is behind us and autumn is in full swing.  In fact, there are frost warnings tonight in my area.  Now I have to admit that I am a warm weather gal.  By the end of the winter, I am about ready to jump out of my skin after being “trapped” inside all winter long.

Now with all that being said there are a few things that I actually look forward to as the weather gets chillier and one of those is apples.  My daughters absolutely love apples. They average 2 each everyday. Let’s hope that an apple a day really does keep the doctor away.  Due to our love of apples, I buy them or pick them in large quantities. Especially if I ever want to get any to bake with or turn into applesauce.

Sunday morning my older daughter asked if we could bake something.  Inside I suggested that we make applesauce (recipe coming soon) due to having bought 10 lbs. of apples recently.  She had a blast using the apple slicer, dicer and coring machine. I have to admit that this is one of my favorite kitchen gadgets too.  If you do not already have one, I highly recommend that you pick one up.  Then Sunday afternoon, I picked up another 10 lbs. of apples. We are literally up to our elbows in apples right now.  One thing to keep in mind though is that when making applesauce, it takes a lot of apples to make a sauce.  My 10 lbs. of apples made 6 pints of sauce.

Tonight we made the rest of the applesauce and as I giving it a final stir I got to thinking that maybe I should use a bit of it to make muffins.  I love applesauce muffins. They are moist, delicious and healthy. It doesn’t get much better than this.

Here is what you need:

1 1/2 c. rolled oats

3/4 c. AP flour

3/4 c. whole wheat flour

1 tsp. baking soda

1 tsp. baking powder

1/2 tsp. salt

1 1/4 c. applesauce

3/4 c. sugar (I like to use the Truvia sugar blend)

1 egg white

3 tbsp. canola oil

1/2 tsp. vanilla extract

3 tbsp. wheat germ (optional, but so tasty)

3/4 c. craisins or raisins


Here is what you do:

First preheat your oven to 400 degrees.  The mix all the wet ingredients together and stir just until combined.  Next slowly add the dry ingredients and stir until well combined.  Finally, stir in the craisins.  Line a muffin tin with muffin wrappers or spray with nonstick spray. Then fill each tin almost to the top. Bake for 20 minutes or until the muffins are golden brown.  These are truly delicious.  I love them smeared with a little butter but my kids like them right out of the muffin wrapper. They are a treat for the whole family.


What is your favorite apple recipe? Do you like to bake with them or use them in more savory dishes? I would love to hear from you!


Comments (4) »